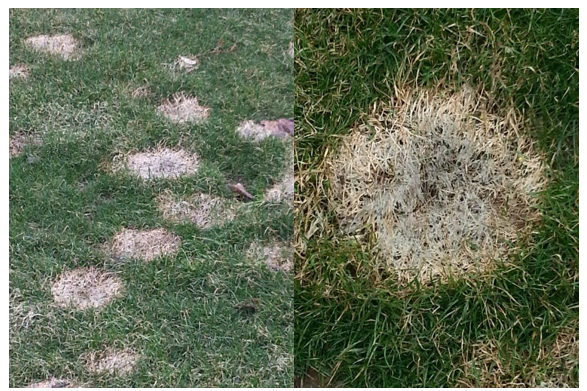
Fairway Green, Inc
9 Ilene Ct, Suite 14 Hillsborough, NJ 08844
Phone: (908) 281-7888

Monthly Archives: March 2018

Snow Mold Disease

After a snow storm your yard looks pretty and picturesque, like a Bob Ross landscape painting!  But underneath this serene scene there is a lot going on with your grass; including dreaded diseases!  Snow mold is a fungal disease that can become active on turf under the cover of snow in the early spring. There are two types of snow molds common in New Jersey; pink snow mold and gray snow mold.

examples of snow mold disease

Above are two examples of what snow mold can look like on your lawn.

Pink Snow Mold

Once the snow starts to melt, pink snow mold disease becomes evident.  Pink snow mold gets its name from the pink fungal spores that collect on the grass leaf.  These spots will start out straw colored and the accumulation of spores on the grass leaf can become so numerous it starts to produce pink circular spots in the lawn that have a matted down appearance.  The spots can grow to five inches in diameter and have a bronze border.  When there are multiple spots, they can coalesce into larger irregular areas in the lawn.

Pink snow mold disease can continue during wet weather if the temperatures are between 35° F and 65° F, with an optimal temperature at 45° F. Pink snow mold does not only occur under heavy snow, the activity also occurs in light rains, heavy dew, overcast skies, fog and most importantly, extended leaf wetness.  It can take from forty-eight hours up to seventy-two hours for this disease to start to form.

Gray Snow Mold

Gray snow mold disease is similar to pink snow mold discussed above, but with a few different distinctions.  First being the color of the disease.  The patches will start out as a straw-colored spot then turn gray or silver in color.  The patches can range from several inches to large swaths of turf.  This disease can live in the thatch layer, the crown and/or the leaves of the grass plant over the summer time.   Secondly, gray snow mold only occurs under snow cover, while pink snow mold can occur with or without snow cover.  In most cases this disease kills the blade of the grass and not the crowns or roots.

Gray snow mold occurs between 35° F to 50° F with an optimal temperature of 35° F.  Heavy thatch can also play a key role in the formation of gray snow mold disease.  Other factors that can contribute to this disease are light rains, heavy dew on the turf, overcast skies, fog and extended leaf wetness.

Cultural Practices

Pink and gray are the most common of the snow molds and with both types of snow molds, the key factor that starts these diseases, is that snow covers the ground before the soil freezes.

Both diseases can be managed successfully at home with simple cultural practices.

  1. Maintain adequate fertility levels in the lawn. A soil test can be done to see which nutrients levels need to be adjusted in the soil.
  2. During the season, water your lawn correctly. Try to avoid moisture stress (drought) and water at the optimal times of day.  We recommend watering for 1 – 1 ½ hours per zone twice per week between midnight to 6 A.M.
  3. Mow into the late fall (as long as the grass is currently growing) at proper mowing heights by keeping the grass blades at 3 – 3 ½ inches in length. If the grass is too tall going into dormancy, the matted down grass can encourage snow mold disease.
  4. Core aerate the lawn in the fall. This process not only reduces the thatch layer, where these diseases can harbor, but is also beneficial to the lawn in so many other ways (see our core aeration blog for more information).
  5. After a snowfall try to not pile up too much snow in one area. The longer the grass is under the snow the more time it receives zero sunlight and oxygen.
  6. After the snow is melted and you can see the matted down spots, use a light plastic leaf rake to break the crusty matted down grass and gently “fluff” up the areas with the rake. This will improve air flow and growth.

Conclusion

Winter is a harsh time of year and lawns that are infected with either type of snow mold disease are generally late to green up.  The damage caused by snow mold is not usually serious.  Applying fungicides in the spring after the symptoms of snow mold appear is of no value and will not help.  But patience and a little bit of TLC goes a long way. If you are in our service area and have any questions about topics of snow mold disease, please give our office a call at 908-281-7888.

How to Prepare your Lawn and Landscape for Spring

damaged mower blades

Spring is the time of year we think of warmer temperatures, longer days, plants budding and nice flowers.  Before you start planning the outdoor barbecues and family get togethers, you may have some clean up to do after the winter weather took a toll on your landscape.  Below are a few helpful tips on how to prepare your lawn for spring and spring landscape maintenance tips that will get your property ready before the outdoor parties and get togethers.

Assess Your Lawn and Landscape

The first step to prepare your lawn for spring is to assess the current status.  Take a walk around your property to look for fallen branches, debris, and any damage that might have been done over the winter and recent storms.  Create a prioritized list of items that need to be done to help stay on task and organized.

Tune Up Your Landscape Equipment

After your property check, it’s a great time to assess your landscaping equipment to make sure everything is in working order.  It will be difficult to prepare your lawn for spring if your equipment is not working properly.  Check your lawn mower, leaf blower, weedwacker and anything else that has a small engine for leaks of any fluids or other obvious signs of damage.  If you didn’t clean your equipment at the end of last year’s season, doing so now will make inspecting for damage a lot easier.  Check the spark plugs on all your gas-powered equipment and change them as necessary.  Once your inspections are done, it’s time to do some routine preventative maintenance.  For your operating equipment, change the engine oil, grease bearings, inflate tires on equipment if applicable, and lubricate moving parts.  Sharpen your mower blades before the season starts and on a quarterly basis going forward.  It’s also a great time to spool your weedwhacker with some new line.

Get Out There

When it comes to preparing your lawn for spring and spring landscape maintenance, cleaning is pretty much on everyone’s list!  Clean out your landscape beds and the borders around the edges of the property from debris that collected over the winter.

Prepare the lawn by raking leftover leaves and debris from the fall.  This will also help if there are any winter lawn diseases present, such as pink or grey snow mold.  By lightly fluffing up the matted down turf with a leaf rake, it will help increase oxygen flow and aid in growing out the disease.  This type of disease will not cause any permanent damage and addressing it early is a great way to prepare your lawn for spring.

The grass may still be brown despite the warmer temperatures.  Don’t worry, the grass will green up.    The thing to understand is that air temperatures do not green up a lawn; it’s the soil temperatures.  As the spring days get longer, the sun has more time to warm up the soil.  Once the soil reaches the ideal temperature for your type of grass, you will notice significant green up.

damaged mower blades

Dull and damaged mower blades like the one in this photo need to be sharpened to avoid shredding grass plants.

Mow Your Lawn

The first mow of the lawn at the beginning of the year will set the tone for the season.  Keep the grass at a height of 3 – 3 ½ inches in length all year long.  Only take off 1/3 of the grass plant at a time.  If you’re going through the steps to prepare your lawn for spring, don’t forget about your lawn mower blades!  Keep your blades sharp to get a clean cut and avoid shredding the grass blade.  A shredded grass blade not only makes the lawn look bad and gives it a whiteish tint, but it also weakens the plant, making it more susceptible to drought, disease and insect damage.

Seed Only if You Must

Although September is the optimal time to seed your lawn, sometimes you just have to seed in the spring.  Large areas that are bare, very thin, or have a lot of old, dead crabgrass plants in the area should be seeded.  You can prepare your lawn for spring seeding by loosening the soil in those areas to about 1 – 1 ½ inches or add 1 – 1 ½ inches of top soil.  Then, mix in your grass seed and lightly rake it into the loose soil.  Grass seed germination rates are higher with better seed to soil contact.  Now water, water, water!  Watering is very important for new seed.  Water every day for 20 minutes per area in the morning to keep your soil and seed moist.  Seeding is the only time we recommend watering at high frequency and short duration.  For tips on how to water your lawn correctly, please visit our blog.  Keep in mind that any areas seeded in the spring will not be able to receive crabgrass or weed controls which in turn will make those areas have issues with weeds and crabgrass all year long.

Check Your Irrigation System

Have your irrigation company come by to check the system and turn it on for the season.  Have any heads or pipes that were damaged from the cold repaired.  Set your watering schedule to start out at one hour per zone twice per week.  You want to get one inch of water on your lawn per week.  As the temperatures get hotter, increase your watering time by half hour increments.  Do not add more days, instead add more time to your watering schedule.  Starting to water early in the season may sound crazy, but if you water early enough and get a good start, it will be healthy going into the harsh summer months and less susceptible to drought, disease and insects.

Prune Trees & Shrubs and Mulch Your Landscape

So far, we’ve focused mainly on how to prepare your lawn for spring, but what about your landscape plants!  Now is the time to start spring landscape maintenance by pruning your trees and shrubs of any broken or dead branches.  For flowering shrubs, wait until flowers bloom so you don’t cut off limbs that will be producing flowers or fruits.  You should assess whether you can remove the branches yourself or if you should hire a company to do so.  A general rule of thumb is if you have to get on a ladder to cut down limbs or branches, you probably should hire someone to do it.  Depending on the nature of what needs to be removed, be sure to pick the right person for the job.  Also, be sure that any tree company that you use is properly insured and licensed.

Plant your annual flowers.  This is a good time to spruce up your landscape with flowers.  Flowers can really add a lot of ‘pop’ to an otherwise mundane landscape.  Like shrubs, it is important to try and determine where to plant which flowers.  For example, if there is a dry, sunny location that you want to bring color to, wave petunias may be an option.  Or, if there is a lot of shade and moisture in a particular location, impatiens might work for you.  Do you want to plant different flowers every year? If so, annual flowers are what you are looking for.  Do you want to plant just once and have them come up in the same location every year? If yes, then perennials are the way to go.  The choices of what flowers to use in your landscape is limitless.  When purchasing new flowers or shrubs, be sure to read the tag to determine the proper planting location.  For example, if you have an area that is mostly shaded, look for plants that prefer shade or minimal sun to give it the best chance of thriving in your landscape.

Replacing dead or dying shrubs is another key step to preparing your landscape for the spring.  If the shrub is dead, see if you can determine why it died.  Is it the right plant for the location? Are the soil conditions ideal for the plant?  It is a good idea to determine these factors before replacing the dead shrubs with the same, or similar, plant.  If it is deemed that the location is not ideal for the plant you want, you will be replacing that plant year after year.  If you are unsure how to determine this, just give us a call and we will be happy to help you.

Maintain 2 – 3 inches of fresh mulch on your landscape.  This will help regulate the soil temperatures and help hold soil moisture for the trees and shrubs, reduce weed growth and give your landscape that nice clean maintained look.  Please note that mulch should not be piled high on the trunk of trees or covering the shrubs. This will lead to decay and damage in the future.  For more information on mulching and the risks of having too much mulch, please see our blog on mulching your landscape.

Repair Damages to Your Home or Property

We’ve gone through ways to prepare your lawn for the spring and tips for spring landscape maintenance, but don’t forget about the house!  Now is the time to make repairs to the outside of your house as well, here are a few common issues:

  • Repair and clean clogged gutters
  • Fix shingles that were damaged during the winter
  • Mend fence posts or panels that are loose or broken
  • Sweep gravel back into your stone or brick walkways
  • Seal your driveway if necessary
  • It’s also a great time to repair damages or reseal your deck
  • Fix landscape lighting that may have stopped working over the winter

Conclusion

When it comes to preparing your lawn for spring and starting your spring landscape maintenance, it seems like the to do list keeps on growing!  That being said, there are perks to owning a home.  It’s your sanctuary and taking pride in our properties adds benefits to our lives, communities and our environment.  If you are in our service area and have any questions about topics covered in this blog, such as proper mowing, watering, seeding, etc. please don’t hesitate to call us at 908-281-7888.

Getting Rid of Voles

The picture above shows what runways from voles look like in a lawn. Learn more about getting rid of voles below.

What is a Vole?

Have you ever heard of a vole? Don’t worry, although this rodent is common, many people have never heard of them. Often referred to as meadow or field mice, these small rodents are generally dark brown or gray in color and only around five to eight inches in length, while their body is frequently more robust than a mouse.

Voles construct runways at the lawn surface with numerous burrow openings that typically stem from shrub beds or wood lines. In some cases, the network of runways can be extensive, covering a significant area of a property. While these trails can be found any time of the year, they are most often discovered as snow begins to melt in the early spring. Under snow cover and hidden from predators, voles will venture further into open areas foraging for food. Following a winter with persistent snow coverage for long periods, damage tends to be worse.

Distinguishing a Vole from a Mouse

Prior to protecting your property and getting rid of voles, it is important to be able to identify the mouse-like rodent as it differs from other rodents like moles, mice and rats. Voles are almost always mistaken for mice and one of the best ways to differentiate the rodents is by tail length. Mice have long tails that are equal to about half of their body length while voles’ tails are shorter. Their tail has thin hair and is darker on the upper side than the lower side.  Another distinguishing characteristic includes their round head shape and blunt snout. The voles’ eyes are very small and black, and their ears are covered by fur.

There are several species of voles that are native to our area and eat a wide variety of plants, most frequently grasses and glasslike plants. In the late summer and fall they store seeds, tubers, bulbs, and rhizomes. They primarily eat bark in the fall and winter, and will also eat grain crops, especially when populations are high. Occasionally food items include snails, insects and animal remains. Voles are active day and night year-round, with peak activity being from dawn to dusk. Their home range is usually a quarter of an acre or less, but this range varies with season, population density, habitat and food supply.

Most importantly, voles need ground cover to survive and therefore avoid open ground areas. Cleared spaces as narrow as 10 inches inhibit their movements.

Although voles breed throughout the year, breeding is most common during spring and summer months. Generally, they have one to five litters per year and litter sizes range from one to 11 young and the gestation period is about 21 days. Further, the young are weaned by the time they are 21 days old, and females are sexually active in 35 to 40 days. Voles have short life spans that generally range from two to 16 months.

Getting Rid of Voles

Unfortunately, the eradication of voles is not easy for homeowners, nor is it completely necessary. However, if getting rid of voles is a priority, repellents or chemical lures can be effective in some cases but cannot provide one hundred percent control. Additionally, these chemical repellants should be used with caution due to subsequent effects on certain birds and other small mammals like chipmunks and squirrels.

Traditional mmousetraps(a ‘snap trap’) baited with food items and placed near the runways can also be effective in catching some voles. Nevertheless, this method does not reduce the vole population numbers significantly.

Protecting plants from voles in shrub beds can be done with a fence buried three to six inches below the soil surface and bent outward into an L shape. Above ground, the fence should be from four to 12 inches tall. Use non-rusting, one quarter inch mesh. Hardware cloth works well for this purpose.

Removing weeds, mulch and other crop litter around gardens will help protect plants. Create a bare border space around your garden or dig a trench twelve inches in depth and wide enough to step over easily to discourage voles. To learn more about weed control in mulch beds, check out helpful tips about applying pre-emergent weed control.

While getting rid of voles may be difficult, the damaged grass and plants can grow back! Once the grass begins actively growing, vole trails become less obvious. Spring fertilization helps speed the lawn’s recovery; however, minor touch up seeding may be necessary to further correct the issue.

Conclusion

One key takeaway about voles is that they prefer a location with cover. Expect to have less vole damage during mild winters with short periods of snow cover. If you are in our service area and have any questions about getting rid of voles, please feel free to call our office at 908-281-7888.

9 Ilene Ct, Suite 14, Hillsborough, NJ 08844 United States | (908) 281-7888
Phone: (908) 281-7888 Fairway Green Inc.